What's in this post...
![]()
Last Updated on January 8, 2024 by Graham Walsh
I have posted a new article here on setting up accounts in 2024.
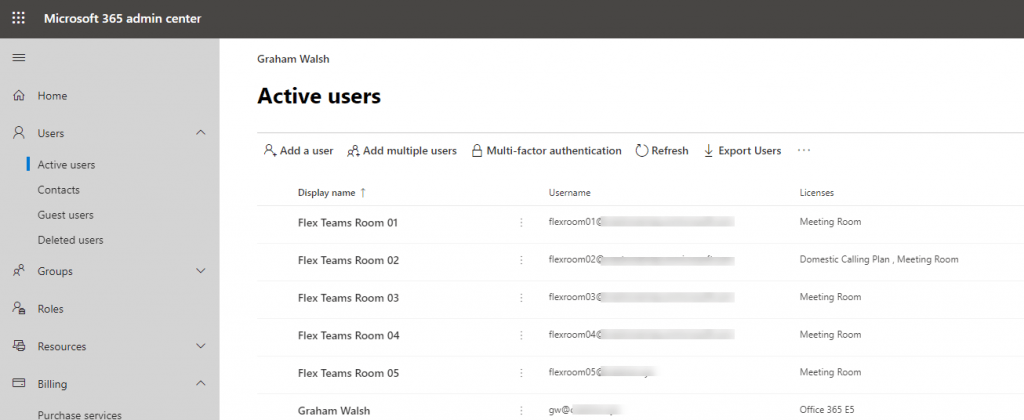
When setting up Microsoft Teams Devices, you need some user accounts so the devices can be scheduled via Exchange/Outlook and then also sign into Skype for Business and Microsoft Teams. In the real world, you need to have Resource Mailbox accounts but now with new features say with Teams, you need to have licenses assigned. Microsoft has created a nice new license SKU, called the Meeting Room License. Some details on licensing can be found here.
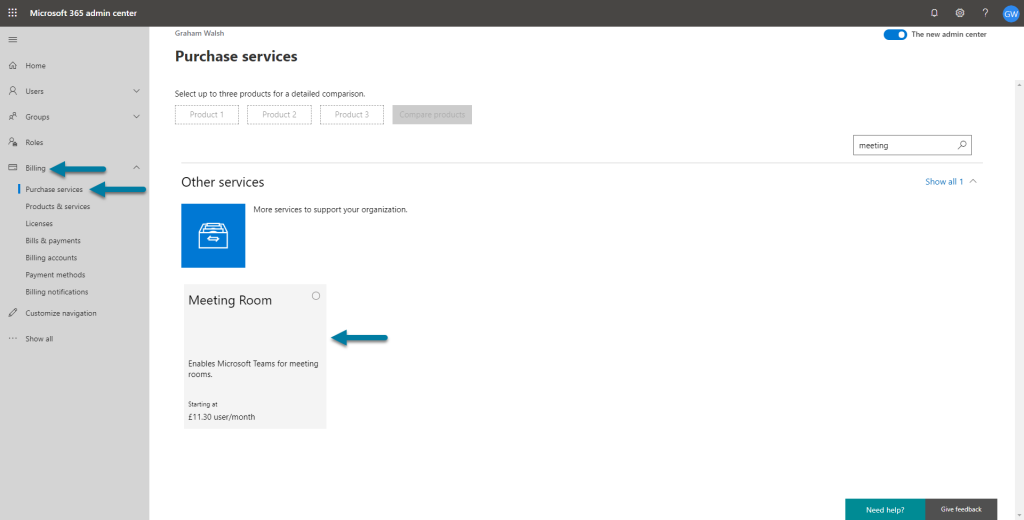
The good news is that you can try this before you buy, just need to head over to your Office 365 Admin Center and navigate to Billing > Product & services. You can use the search box on the right to look for meeting and you’ll see the license in your local currency.
If you are pure Office 365, then this blog post might help you out in creating the accounts. I did a hybrid account create guide here in the past. It was Exchange Online, with Azure AD Sync and SfB On-premises. Microsoft has an official guide here on setting up accounts here however, I like to be different 🙂
This is post is about standard authentication and not MFA authentication. If you have have MFA, I will do another brief post on this.
As Office 365 has different modules for Exchange, Skype and Active Directory, you need to install some modules and then connect to the various modules. Below is a script that can do it all in one hit and using PowerShell ISE, you can step through each line by pressing F8. You can just copy this code and paste it into PowerShell ISE (and run it as an Administrator).
PowerShell Code
####Pre Reqs to install
Install-Module -Name MSOnline
Set-PSRepository -Name PSGallery -InstallationPolicy Trusted
Install-Module -Name AzureAD
### Download Skype Online PowerShell
https://www.microsoft.com/en-us/download/details.aspx?id=39366
### Install Exchange Online Module
### change your domain below
https://outlook.office365.com/ecp/?rfr=Admin_o365&exsvurl=1&mkt=en-US&Realm=mydomain.onmicrosoft.com
### Connecting to Microsoft Online Services
Set-ExecutionPolicy RemoteSigned
$orgName="mydomain.onmicrosoft.com"
$credential = Get-Credential
Connect-MsolService -Credential $credential
Import-Module SkypeOnlineConnector
$sfboSession = New-CsOnlineSession -Credential $credential
Import-PSSession $sfboSession
$credential = Get-Credential
$exchangeSession = New-PSSession -ConfigurationName Microsoft.Exchange -ConnectionUri "https://outlook.office365.com/powershell-liveid/" -Credential $credential -Authentication "Basic" -AllowRedirection
Import-PSSession $exchangeSession -DisableNameChecking
### View your licenses avaialble
Get-MsolAccountSku
### Meeting Room Variables
$newRoom="flexroom01@mydomain.com"
$name="Flex Teams Room 01"
$pwd="myS3cureP4ssw0rd"
$license="mydomainname:MEETING_ROOM"
$location="GB"
### Creating a new Account
New-Mailbox -MicrosoftOnlineServicesID $newRoom -Name $name -Room -RoomMailboxPassword (ConvertTo-SecureString -String $pwd -AsPlainText -Force) -EnableRoomMailboxAccount $true
### Wait one minute before configuring the new account
Set-MsolUser -UserPrincipalName $newRoom -PasswordNeverExpires $true -UsageLocation $location
### Assigning a license to the room account
Set-MsolUserLicense -UserPrincipalName $newRoom -AddLicenses $license
### Setting a MailTip for the Room
Set-Mailbox -Identity $newRoom -MailTip "This room is video enabled to support Teams and Skype Meetings"
### Configs the account to process requests
Set-CalendarProcessing -Identity $newRoom -AutomateProcessing AutoAccept -AddOrganizerToSubject $false -RemovePrivateProperty $false -DeleteComments $false -DeleteSubject $false -AddAdditionalResponse $true -AdditionalResponse "Your meeting is now scheduled and if it was enabled as a Teams or Skype Meeting will provide a seamless click-to-join experience from the conference room."
### Enabling the account for SfB Online - Find the pool first then use the name in -RegistratPool
Get-CsOnlineUser |ft RegistrarPool
### Wait a few minutes before running this next command
Enable-CsMeetingRoom -Identity $newRoom -SipAddressType "EmailAddress" -RegistrarPool "sippoolCWLGB101.infra.lync.com"
### Enable the account for Enterprise Voice
Set-CsMeetingRoom -Identity $newRoom -EnterpriseVoiceEnabled $true
### Apply a calling plan to the user
Set-MsolUserLicense -UserPrincipalName $newRoom –AddLicenses "mydomainname:MCOPSTN1"
#### Option Configuration
### Getting Room Mailboxes ###
Get-Mailbox -RecipientTypeDetails RoomMailbox
### Finding and setting allowed external meeting invites from outside the domain
Get-Mailbox "Flex Teams Room 01" | Get-CalendarProcessing | Select *external*
Get-Mailbox "Flex Teams Room 01" | Set-CalendarProcessing -ProcessExternalMeetingMessages $true
### Checking the Meeting Room Configuration
Get-CsMeetingRoom -Identity "$newroom"
Get-Mailbox -Identity "$newroom" | fl
Creating Room Lists
One feature that you also should do for Teams Meetings and that is to create a Room List. Full details can be seen here. There are just two lines of PowerShell to run. The first is to create the Room List and then second is to add the Resource Mailbox to that Room List. Note that there is a limit of 100 rooms that will be returned in a query, so may need to break down to Building and Floors for large organisations.
### Cresting a Room List per site/floor ###
New-DistributionGroup -Name "Crestron London Office" -RoomList
Add-DistributionGroupMember -Identity "Crestron London Office" -Member flexroom02@domain.com


Creating a Resource Config in Exchange
Another optional feature on Exchange Resource Mailbox configuration is the ability to add a description to each room, so when people are booking the rooms, they know what features are available in each space. This is using ResourceConfig settings.
### Creating Meeting Room Resource Properties - visible via Description
### This allows customisation on your tenant
Enable-OrganizationCustomization
### This shows what custom config if any
Get-ResourceConfig
### Let's set a custom descritpion of MicrosoftTeamsRoom.  Unfortunately you can't have space or underscores.
Set-ResourceConfig -ResourcePropertySchema "Room/MicrosoftTeamsRoom"
### Now we can add other attibutes
Set-ResourceConfig -ResourcePropertySchema @{Add="Room/MagicWhiteboard"}
Set-ResourceConfig -ResourcePropertySchema @{Add="Room/VTC"}
### Now we are going to Room 02 with MicroosftTeamsROom and MagicWhiteboard
Set-Mailbox "Flex Teams Room 02" -ResourceCustom "MicrosoftTeamsRoom"
Set-Mailbox "Flex Teams Room 02" -ResourceCustom @{Add="MagicWhiteboard"}
### Room 05 will just have VTC set
Set-Mailbox "Flex Teams Room 05" -ResourceCustom "VTC"
Now, this is what it looks like in Outlook when you click on Location to find a room.

Outlook Web Access – Set-Place
There is also another feature that I’ve seen in Outlook Web Access and that is the ability to filter by the feature of a room, the room capacity or what floor it is on. This is known as set-place. It is only available in Office 365 Exchange Online. Thanks to Pat Richard and Greg Taylor for helping me find this. There is an official blog post on this here.

Here is the PowerShell to set some examples and blow is an image once the properties have been replicated.
Set-Place -Identity "Flex Teams Room 02" -AudioDeviceName Crestron -VideoDeviceName "Crestron Microsoft Teams Room" -Capacity 6 -DisplayDeviceName "32inch Samsung LCD" -Floor 0 -Tags "Skype Enabled","Teams Enabled","Video Interop Enabled" -PostalCode "KT15 2HJ" -Phone 08715258341 -CountryOrRegion GB -City Weybridge -IsWheelChairAccessible $false -GeoCoordinates "51.372997;-0.479396"
Once you have created the account, it can take up to 24 hours to replicate and become good. That’s my advice. Sometimes it will sign in and be good, other times not, so best to have it prepared in advance. The other consideration of why the device may not sign in, is of course networks and firewalls. Microsoft has detailed what ports and addresses they use here for Teams Devices.
MVP Randy Chapman has a similar post here that was recently published too.
The other consideration is around domain joining the MTR device once you have it online and sign in. Another guide here at the Microsoft docs site.
Does your organisation use Intune for example? Will it need to be enrolled etc? Or if it’s a conference phone, you can manage that from the Teams Admin Center. Full details here on the Microsoft site.
That’s it for now on setting up the device account for your Microsoft Teams Room.